The Power Supply Unit (PSU) is an internal hardware unit that is responsible for converting AC (Alternate current) to low voltage regular DC (Direct current) for internal parts of desktop computers as required. It is fixed on the bottom back or tops back of the CPU.
From there, DC is provided to internal components of computers such as motherboard, CPU, hard drives, disc drives, and video cards, all power from the power supply. The external parts and devices such as the monitor printer and speaker have a power source over the data cable like some USB.
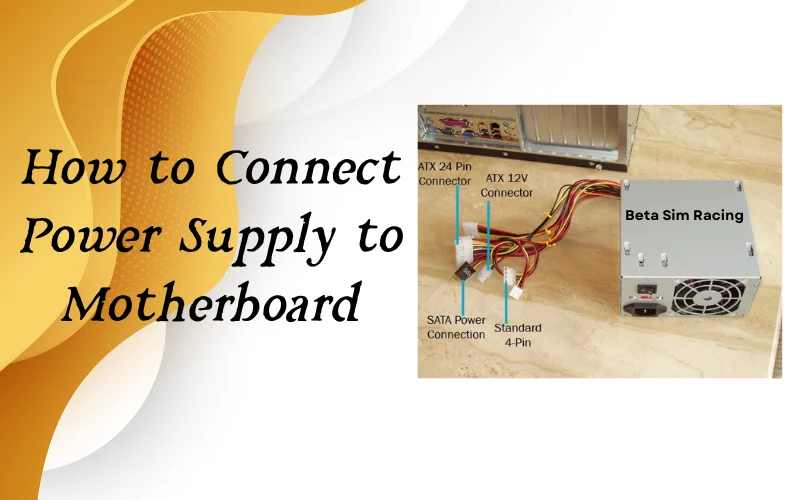
How to Install Power Supply to Motherboard?
- You will begin with 24-pin cables, these are always located on the right side of the motherboard, and the other end of the cable is connected to the power supply.
- The CPU cable port is usually located on the top left of the motherboard. The cable can be split into two 4-pin headers. Smaller motherboards, such as a micro ATX, required only four pins. Everything size of ATX and above will require all 8 pins.
- The other cable pins will be connected to the power supply.
- Connecting to a graphic card, the PCI cable plug directly into the CPU to supply power. The ports will be located somewhere along the front of the GPU. The other end of the cable will be connected to the power supply.
- The SATA power cable plugs directly into your drive. Molex cable can be quite challenging to connect as the pins can be moved around a bit. Try to plug in at both ends.
Related Article: How to Tell if Your Power Supply or Motherboard is Faulty?
PC Power Supply Connections
You can follow these steps to connect the cables to the power supply:
- The first start with the 24-pin at the top left of the power supply. A smaller header just below it is labeled.
- Headers, we will now plug in our CPU cables, without the CPU level is blocked into the power supply.
- PCI cable, which is directly right from our previous cables, GPU uses only one PCI cable, but if you require plugging both.
- Finally, reply in our Molex and SATA power cables in the section labeled peripherals.
Guide: How to Connect Power Supply Cables?
Different power supply cables and connectors connect with computer parts to power and function properly. Which are explained below.
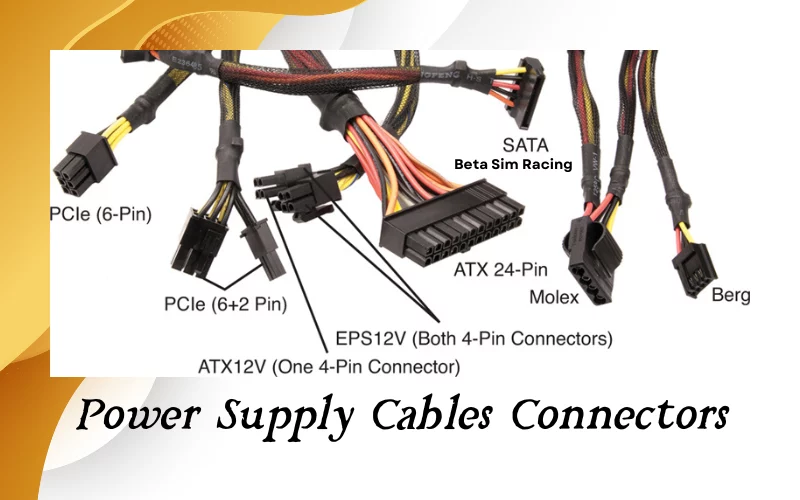
1) 24 Pin Cable
This is your motherboard connecting cable. These modern power supplies are available in two connectors (20+4-pin) which can be used together to form the 24-pin connector. The 24-pin power connection or 20+4 pin connector can be used in 20-pin motherboard connectors. (Do not connect 4 pins).
Nowadays, modern motherboards require 24-pin power connections only. To connect the pin with the motherboard, you push and ensure it’s inserted to avoid extra force, or losing it may damage your connector pins.
2) 8-Pin Cables (4+4 pins)
This is the CPU power supply cable that supplies power to the processor. It looks very similar to PCI cables but is not interchangeable. Triple-check that you have the correct cable before plugging in! Make Sure it is labeled CPU and not PCIe. CPU power supply cables are also split into two separate 4-pin headers. Some smaller motherboards, such as a MicroATX, require only four pins.
3) Molex Cable
This is a Molex cable. These cables can be used to power accessories, such as fan controllers.
4) 6/8 Pins PCI cable
This is a PCIe cable. It’s primarily used to power your graphic cards. PCI cables are often split into 2-pin and 6-pin headers.
5) 15 Pins SATA Cable
This is a SATA power cable. It primarily powers HDDs, SSDs, and optical disc drives.
Computer Power Supply Wiring Diagram
The computer power supply wiring diagram differs from brand to brand. It shows the input of the power supply. The thermostat circuit protects it from higher or lower voltage. The class x capacitors protect the following circuit from electromagnetic interference.
There are also barriers to switching noises. The positive voltage can reach the positive AC rail. The transformers will get the positive voltage. The rectifier then rectifies the voltage and passes through the inductor. The voltage will be regulated in the regulator after being filtered. Lastly, the output voltage is maintained.

- Take the quickest path to your port when installing the power supply.
- Do not forget cable ties. Put the cable in the right place and tie them.
- Manage and handle the cables carefully.
Power Supply Connectors and their Function
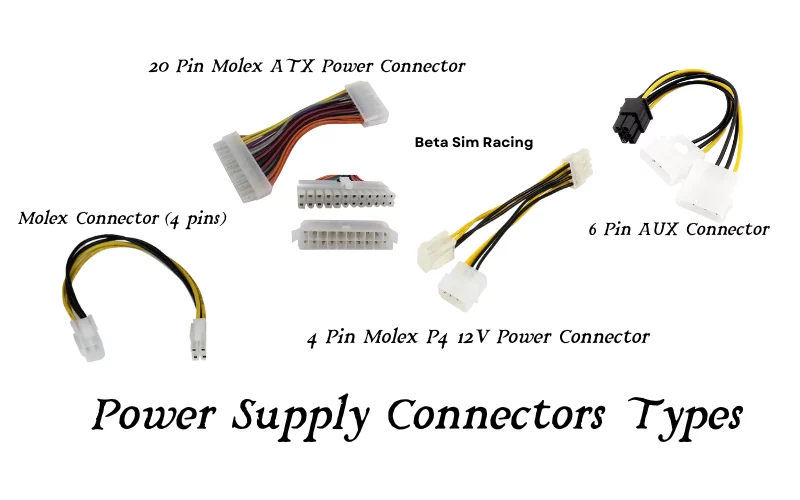
Different power supply connectors have different functions. You can read about them below:
Molex Connector (4 pins): This connector powers up various parts, like hard drives and optical drives.
20 Pin Molex ATX Power Connector: This connector powers up the motherboard in ATX systems. These boards are available in ATX (ATX-2 has four extra pins)
4 Pin Molex P4 12V Power Connector: These connectors are explicitly used for Pentium 4 Processor Motherboards. These motherboards are available in ATX (integrated into the power connector in ATX-2)
6 Pin AUX Connector: These connectors provide +5V DC and two connections of +3.3V. These are available in ATX/ATX-2.
Power Supply Connectors Types
There are different types of power supply connectors.
- Pin Berg Connector (4 Pin): These are used to connect the Power supply unit to small form factor devices, such as floppy drives 3.5″ and available in AT, ATX, and ATX-2
- Molex Connector (4 Pin): These connectors are used to power various components such as hard drives and optical drives that are available in AT, ATX & ATX-2
- Molex ATX Power Connector (20 Pin): These are used to power the motherboards of ATX systems that are available in ATX. ATX-2 has four extra pins.
- Molex P4 12V Power Connector ( 4 Pin ): These are used specifically for Pentium 4 Processor Motherboards that are available in ATX (integrated into the power connector in ATX-2).
- AUX Connector (6 Pin): These power connectors provide +5V DC and two connections of +3.3V. They are available in ATX/ATX-2.
Power Supply Cable Types
1) 24 Pin Cable
The 24-pin cable supplies power to the motherboard, and a modern motherboard has a 24-pin power supply. It also provides additional power to the PCIe slots of the motherboard.
2) PCI Cable
This cable is used to power graphic cards. It’s very similar to a CPU cable. PCI cables are often split into two pins and six heads. Depending on your motherboard specifications, it will accept a single 4-pin or single 8-pin. The 8-pin cable provides 155 Watt while 4 pin cable provides 235 Watt power. PCIe connectors are the most decent cables having 100Watts of power under load.
3) SATA Cable
SATA power connector cables are 15-pin cables. They are intended to power various storage devices, including modern hard disks, SSD drives, and optical drives. Various fan hub controllers and RGB strips can be connected with the cables.
Modular Power Supply Cables
A power supply is an electronic gadget. There are inbuilt cables with few connections present in a PC case. For providing electrical supply or energy to essential PC components like motherboard, processor, HDD, SDD, cooling fans, etc., through an interfacing control supply opening accessible on the motherboard.
In other words, it provides voltage power throughout the computer system. It usually looks like a metal box in the computer case’s corner. Modular power supply has two types:
- Semi Modular Power Supply
- Fully Modular Power Supply
They have explicit instructions regarding the whole process if you wish to do that.
See the front panel header that can undoubtedly be on the right bottom of the motherboard. The header may also be labeled so you can easily find it.
Try to determine the pins with the power switch.
Get a power button jumper and connect it with the pins. Now the power button is connected. You can switch it on to power up the PC.
ASRock motherboard does not require a jumper. Just connect the power button to the front panel chassis. You can also connect a Reset button to the front panel chassis. That needs to be restarted on the computer.
To connect the power button to the ASUS motherboard, you may find the pins and their positive and negative sides. Just connect the pin with the front panel header and it will be on.